
A Matter of Perspective

SUPPLIES NEEDED:
Tube of choice – I’m using one by Ally FellR
Plugins - Mura Meister's Clouds and Perspective Tiling
Plugins - Eye Candy 3.1 - Perspective Shadow
Cityscape image of choice
Fonts of choice or – Strasua
Image & Font - SUPPLIES
Jasc Animation Shop 3
REMEMBER TO SAVE OFTEN!
1. Open up your new image 650x550 – transparent UNCHECKED. Color white.
2. Select a light color from your tube and then a dark color. On your materials palette, go to gradient and choose foreground-background. New raster layer and floodfill this layer with the gradient.
3. Effects – Mura Meister Clouds – on default settings.
4. Choose your selection tool – rectangle – feather 0. Draw out a rectangle about half of your tag. New raster layer.
5. Go to your materials palette – pattern – and choose a pattern of choice (one that most fits your tag would be a good choice). Floodfill the selected layer with this pattern. Selections –Select None.
6. The ‘horizon’ is way too straight of a line, so go back to your selections tool – rectangle – feather (30). Draw out a narrow rectangle between the clouds and the horizon. Press delete about twice. Deselect.
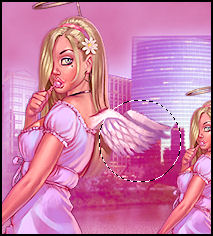
7. Open your cityscape image. Copy and paste as new layer on your tag. Position within the clouds. Double lick on this layer and choose blend mode to overlay.
8. Copy and paste your tube as a new layer. Leave as big as it is…unless it’s too big and you can’t see the head or feet – mine was resized to about 80%. Yours could be even smaller or larger, all depends. Position on left side of tag (see mine for reference).
9. Duplicate this tube and mirror. Resize by 80% and position on right side of tag, making it seem like the girl is moving further away from you.
10. Duplicate – Mirror – Resize by 80% - position on left side of tag. Keep repeating this process until you have about five tubes like my tag.
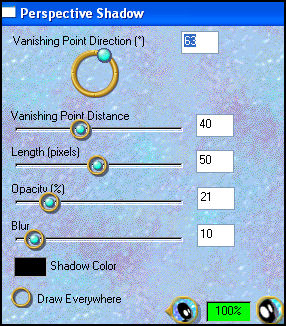
11. On your largest tube – Effects – Plug ins – Eye Candy 3.1 – Perspective Shadow on these settings:
12. For the other tubes, set the ‘Vanishing Points’ to either 0 or 172 – 0 for the tubes on the right and 172 for the tubes on the left.
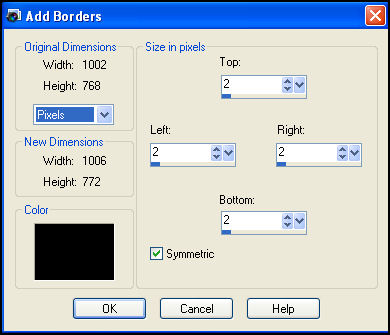
13. Image – Add Borders with these settings:
14. Image –Add Borders again, only this time, change the color to white and values to 10
15. Repeat step 13. And then repeat step 14. And last repeat step 13.
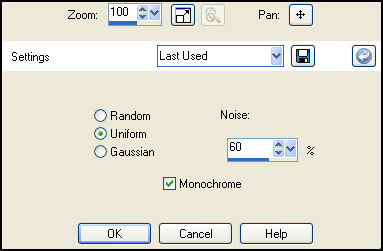
16. With your magic wand, select inside the innermost border. Flood fill with the dark color from your tube. Go to Adjust – Add/Remove Noise with these settings:
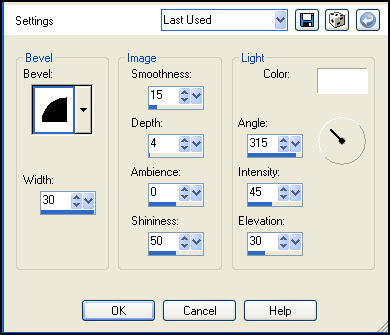
17. De-select and with your wand, choose the outermost border. Select. Flood fill with dark color again. Apply inner bevel with these settings and deselect:
18. Go to your selections tool – circle – feather 0 – draw out a circle about this large:
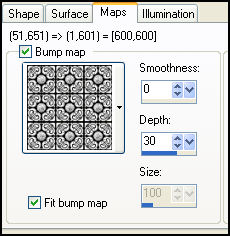
19. Floodfill with your dark color from tube. Effects – Artistic Effects – Balls and Bubbles – Single ball and maximum possible size checked. Click on the ‘Maps’ tab with these settings:
20. Apply light drop shadow – 0,0,50,10 – Deselect.
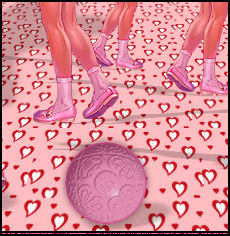
21. Position ball next to the largest tube. Duplicate and reduce by 80%. Position this next to your second largest tube. Duplicate and reduce by 80%. Continue this until you have five balls all positioned next to your tube. For the last ball, you might have to reduce it by 80% twice…again this depends on the tube you’re using. Rename these layers Ball 1, Ball 2 etc.
22. Now, we want to give the illusion that the ball is bouncing on the ground and getting back up again. Hopefully this won’t be too confusing.
23. Click on Ball 1 layer duplicate and position the ball between the tubes like so:
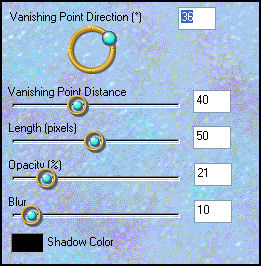
24. Apply perspective shadow to this layer with these settings:
25. Repeat steps 23 and 24 for the other balls, always positioning the duplicates on the ‘ground’ and further away from the first. When done, you should have 10 ball layers in total.
26. Go to your topmost layer and apply your license/copyright information – including your name/text phrase of choice. [Optional – I applied the noise effects to my name text to make it less plain as well as used the same perspective shadow settings for my balls]
ANIMATION CENTRAL!
1. Close out all your ball layers except for Ball 1. Copy merged and paste as new animation in AS.
2. Close out Ball I. Open up Copy of Ball 1 layer. Copy merged and paste after current frame in AS.
3. If you’ve been doing my tutorials, you should have an idea of where this is going. *lol* When done, you should have 10 frames in AS.
4. Edit – Select All – Frame Properties – 50
5. View animation and you’re all set! Below is another version of the same tag. Have fun with it!

Please no hotlinking the images! Neither can you use the tags created for your personal use or on blogs or websites without written permission. This tutorial is registered with TWI.
© KiyaSama - all rights preserved. Tutorial Written 15th June, 2009.
Tutorials Home
|
|